

Special Moon Cake Recipe | Instructions for Making Mooncake at Home
Mooncake is most likely something you haven't heard of before. Do you have any experience with it? If you've never had mooncake before, this page will teach you all there is to know about them, from their history to their recipe. For the most part, mooncakes are a well-known Chinese dessert pastry or snack and can fill them with everything from savory to sweet in filling. It's typically round in shape, representing the moon, although it can also be square in shape, representing the sun.
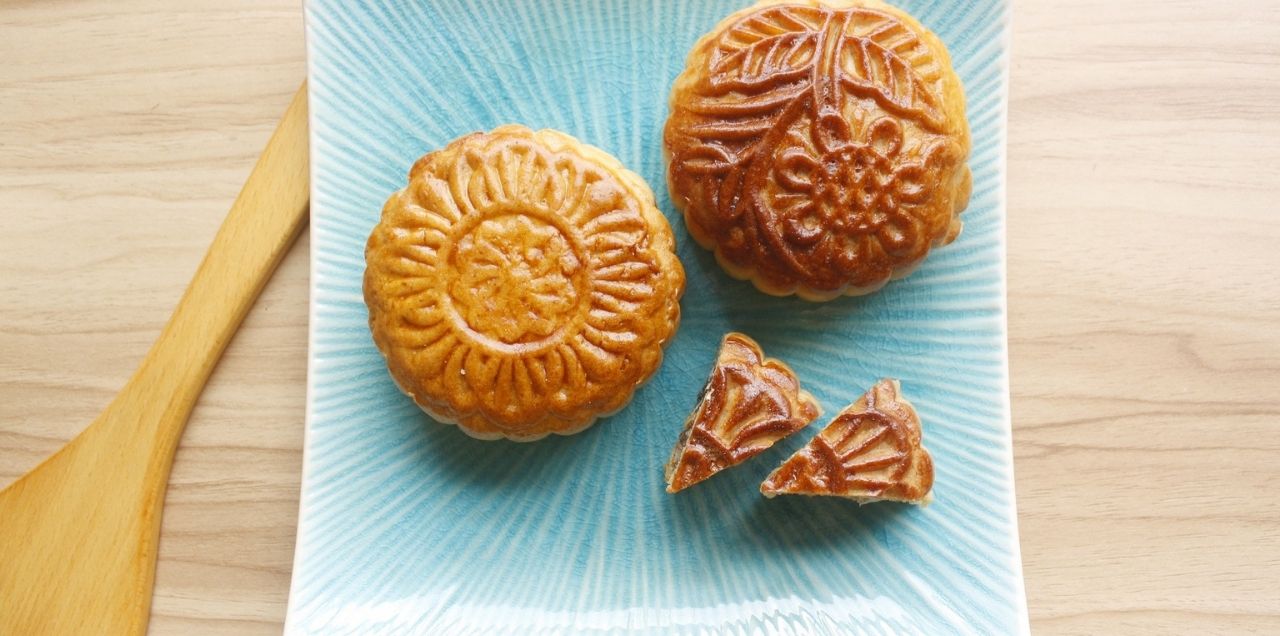
Mooncakes are made in Cantonese, and conventional mooncakes are shaped, baked, and golden brown. The top of the box is a stamp with their names.
Mooncake Syrups
Traditional mooncake fillings include lotus seed paste, sweet bean paste, and Jujube (red date) paste, to name a few. However, individuals have already been experimenting with the meal.
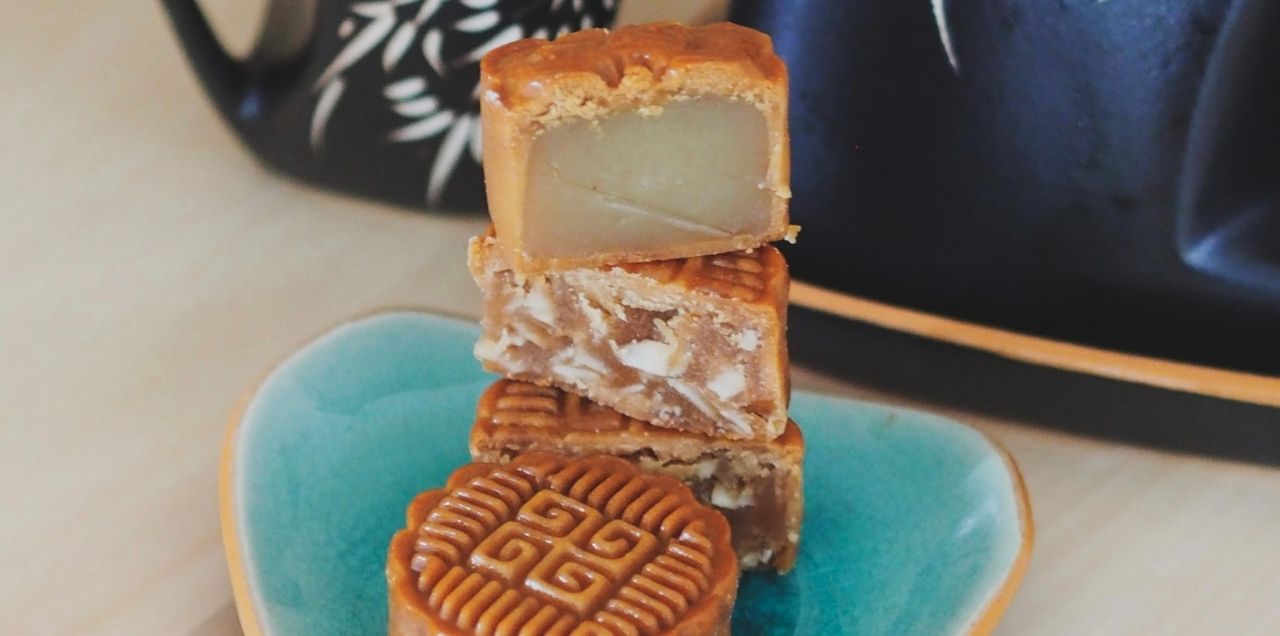
They are now filling the cake with various flavors such as chocolate, strawberry, vanilla, lotus, and coffee syrup, among others. The savory stuffing consists of minced meat, sausages, and other ingredients. Can find mooncakes stuffed with nuts and dried fruit at some authentic Chinese restaurants. The outside layer of a mooncake is formed of dough prepared from cake flour, which distinguishes it from other desserts.
Tools for making mooncakes.
The molds for making mooncakes are available here. Mooncake molds are available in a wide range of styles and dimensions. There are two main shapes: round and square. However, I've also seen images of cakes in the form of flowers or animals on the internet. While authentic mooncakes are fashioned in wood molds, plastic molds quickly gain popularity due to their ease of use and a great variety of shapes. Mooncakes come in various sizes ranging from 50 grams to 150 grams, but I normally like the smaller ones for the following reasons: 1) They are adorable.
You can also achieve the shape of mooncakes by using your hands, but I would not recommend it. It takes a significant amount of time.
Use a pastry brush to decorate cakes and pastries for special occasions.
To apply egg wash to the tops of the mooncakes, use a pastry brush. To better regulate the amount, I'd suggest investing in a brush with soft bristles. To put too much egg on the mooncake would damage its appearance. Thus it would be best if you exercise caution.
The following are the reasons why mooncakes are very pricey.
When it comes to the manufacturing process, mooncakes aren't very expensive. Thus the question is: why are they so pricey? The solution is simple: it's time. Since they require a lot of time to prepare and are frequently packaged with care, they are very costly to buy and consume.
Another explanation for their high cost is because individuals are ready to spend such a large sum of money on mooncakes as a luxury. In addition, bakeries charge exorbitant prices for them, setting the precedent that mooncakes are prohibitively expensive. Mooncakes can be packaged in various ways, including a large wooden box with each mooncake individually wrapped in a spherical metal container.
There's no reason you can't make your own, but doing so takes some time and effort. On the other hand, making them isn't difficult at all. I STRONGLY SUGGEST, just lengthy.
Directions
Producing the filling is the first stage in making mooncakes. Using lotus seeds is an excellent idea. However, soaking them for at least 8-10 hours is highly recommended first.
Should result in the seeds becoming incredibly mushy. When you're ready to bake the next day, rinse the seeds first and divide them into two pieces before you start baking. Removing the green sprouts from your cake is necessary since they are bitter and will detract from its overall flavor.
Pour water into a large saucepan with the seeds, cover, and cook over low to medium heat for about 10 minutes. There is a minimum of 2 hours of cooking required to soften the seeds even further.
As soon as they're soft-sufficient, you'll be ready to crush them up with a spoon. After that, remove the seeds from the water and combine them with the sugar in a food processor. Put all of the ingredients in a blender and process until smooth. If fresh lotus seeds aren't available, canned lotus seeds will work as a substitute.
Steps 1 and 2 can be skipped if using canned lotus seeds. Pour in enough water to obtain a smooth texture in the canned lotus seeds.
Make a medium-sized skillet or saucepan out of the purée and set it aside. Stir it constantly while cooking it at a medium temperature.
You'll notice that the majority of the water has evaporated, leaving only a fairly thick purée. It'll have a hummus-like consistency when finished. The puree can be re-blended in the mixture if you believe it isn't as smooth as you would like it to be at this point.
Can add any fat you like to your puree once it has reached the shape and texture you prefer. This method will work with any hard fat while at room temperature (Except for butter). Coconut oil is something I use and highly suggest. The addition of a dash of coconut to everything elevates it to new heights. Lard and shortening are traditionally used in the preparation of mooncakes.
You will need to whisk the mix till the fat is completely incorporated into the puree. Over a medium temperature, cook this mixture until it comes together to form a dough and turns glossy in appearance, stirring constantly. After a while, the dough will begin to adhere to the spoon. It's a good indication that you've followed the instructions exactly if the dough has the consistency of cookie dough. When you've got the desired consistency and texture, take the pan from the heat and set it aside to cool until you're ready to use it again.
Will prepare the dough in the next stage. Mix alkaline water, vegetable oil, and golden syrup in a large basin until well combined. Likely, the combination won't blend completely, but give it your all to ensure that it does. The next step is to begin putting the ingredients together into a dough. To this end, combine two flours and stir them together with a wooden spoon.
Mix everything until it forms one cohesive mass, but don't overwork it by rapidly kneading. Put the plastic wrap over the dish and let it sit for at least 45 minutes before serving.
Prepare your oven by preheating it to 350 degrees Fahrenheit for a further 10 minutes. Make 12 separate pieces by dividing the ingredients into 12 equal halves. Create balls from each piece. Ideally, it should be around the size of a golf ball. You can use a kitchen scale to weigh each of the balls; they should each weigh about 33-34 grams.
Scoop out approximately a spoonful of dough for each mooncake and roll it out between two sheets of parchment paper to a diameter of 3 to 3 1/2 inches.
Dust your hands with flour to prevent the dough from sticking to your hands during the next step. This step is optional, and the dish will still turn out good even if you don't use flour on your hands before baking. Take the filled ball and fold the sheet of dough around it until it is completely enclosed. It's unlikely that it'll get over the filling in one shot.
You will need to exert considerable effort. The whole dough will need to be gently pressed, pushed, and squeezed onto the filling. However, even though it would most likely take a long time, it will be sufficient to cover the filling.
It's easy to cover a hard filling. Don't be concerned if you are unable to cover the filler completely. Grab the extra dough and wrap it around the ball.
To make things even simpler, you can roll out two little balls of dough (approximately a teaspoon each) and wrap them over each end of the filling so that the lotus paste is completely covered without the need to strain or squeeze.
After you've finished preparing the mooncakes, please place them in a 350° F oven for 8 minutes. While the cake is baking, crack an egg and thoroughly whisk it. If necessary, add additional water.
As soon as they've finished baking for 8 minutes, remove them from the oven and allow them to cool for at least 15 minutes. Then, with a brush, apply an egg white wash on the cake surface.
You'll have to put them back in the oven for an additional 15 minutes. Alternately, bake them until they're a deep golden brown.
Allow them to cool completely before moving on. You can eat once you have cooled down, but if you ask me, I'd recommend that you don't eat immediately after cooking. They will keep for at least two days if kept in an airtight container.
Will cause the cake to exude oil, at which point it will become exceptionally soft, lustrous, and supple. It's the perfect time to take it all in.

Comment